
The Google Chrome web browser is one of the most popular browsers, and it has earned this reputation due to its emphasis on speed and security. Many users prefer it over other browsers due to its security features and the speed and dependability it provides. If you can get past the occasional high resource usage, Google Chrome is one of the best browsers available right now.
Here we will be discussing the “chrome not loading pages” error and some potential ways to fix it.
Why Won’t Chrome Load Pages? How to Fix?
Google Chrome is a popular browser in all aspects such as browsing, downloading, streaming, and much more. However, sometimes you may receive an error stating that Google Chrome will not open and will not load any pages at all, no matter how many times you try to open it.
Whatever you tried to resolve the issue, nothing worked properly. Chrome, not loading drives you insane. You find it difficult to use other browsers because Chrome has your installed extensions, bookmarks, and saved passwords. These browsing data can also be imported, but once you’ve gotten used to Chrome, it becomes so difficult to leave it.
Fix 1: double-check your Internet connection
Chrome will not function if your internet connection is unavailable. Check that your Wi-Fi or cellular connection is turned on. Open another website or run an application that requires Internet access to function.
If the page or application also fails, it means the issue is with your network connection rather than Chrome. For assistance, contact your Internet service provider.
If you cannot load a specific website, the website may have been blocked. To access the site, in this case, you’ll need to use a VPN.
Fix 2: Restart your computer
A simple restart of your computer frequently resolves a faulty app or system issue. Give it a shot if you haven’t already.
Don’t be concerned if your problem persists after rebooting. There are five more fixes to test.
Fix 3: Temporarily disable your antivirus software
Interference from antivirus software can sometimes cause your problem. To see if that’s the issue, temporarily disable your antivirus software and see if the problem persists.
If Chrome works appropriately after disabling your antivirus software, contact the antivirus software vendor for advice, or install a different antivirus solution.
When your antivirus is turned off, be extra cautious about what websites you visit, emails you open, and files you download.
If this did not work for you, continue reading and look at the solution below.
Fix 4: Delete the cache and cookies from Chrome
Chrome’s cache and cookies can sometimes prevent it from running smoothly. Clearing Chrome cache and cookies regularly may help to resolve your issue. Here’s how to do it:
1) Launch Chrome.
2) Simultaneously press the Ctrl, Shift, and Del keys on your keyboard. Then, click the Clear data button.
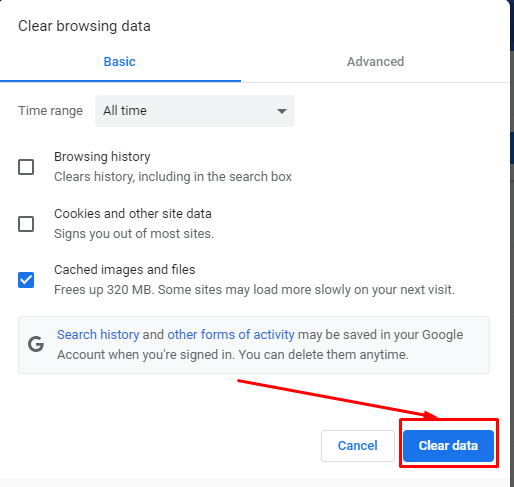
3) Restart Chrome.
If Chrome still doesn’t load pages, try the solution listed below.
Fix 5: Reset Chrome’s settings to their defaults
Chrome can also fail due to incorrect settings. See if the problem is resolved by resetting Chrome settings to default. Here’s how to go about it:
This process will only reset your default search engine, homepage, and tabs, new tab page, content settings, cookies and site data, extensions, and themes.
Bookmarks and passwords will not be deleted or changed.
1) Launch Chrome. Then, select Settings by clicking the Menu button.

2) At the bottom, click Advanced.
3) Choose Restore settings to their defaults.

4) Select the Reset settings option.
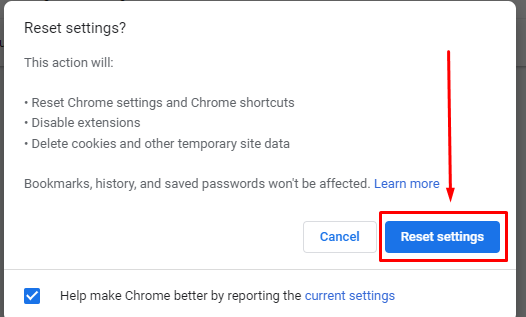
5) Restart Chrome to see if this worked.
Fix 6: Turn off Chrome extensions
The performance of Google Chrome can also be adversely affected by faulty extensions. In this case, disable any unnecessary extensions to see if that resolves your issue. Here’s how to go about it:
1) Launch Chrome.
2) Select the Menu option.
3) Select More tools, followed by Extensions.

4) Click to disable your extensions one after the other, and restart Chrome each time to determine if any of these extensions are the cause of your problems.

Don’t worry if this doesn’t solve your problem. There is one more solution to try.
Fix 7: Reinstall Chrome as a last resort
Chrome files that are corrupted or damaged may also prevent Chrome from running smoothly. If that’s the case, reinstalling Chrome is almost certainly the solution. Here’s how to go about it:
1) To begin, press the Windows logo on your keyboard. Then, type control and press the Control Panel button.
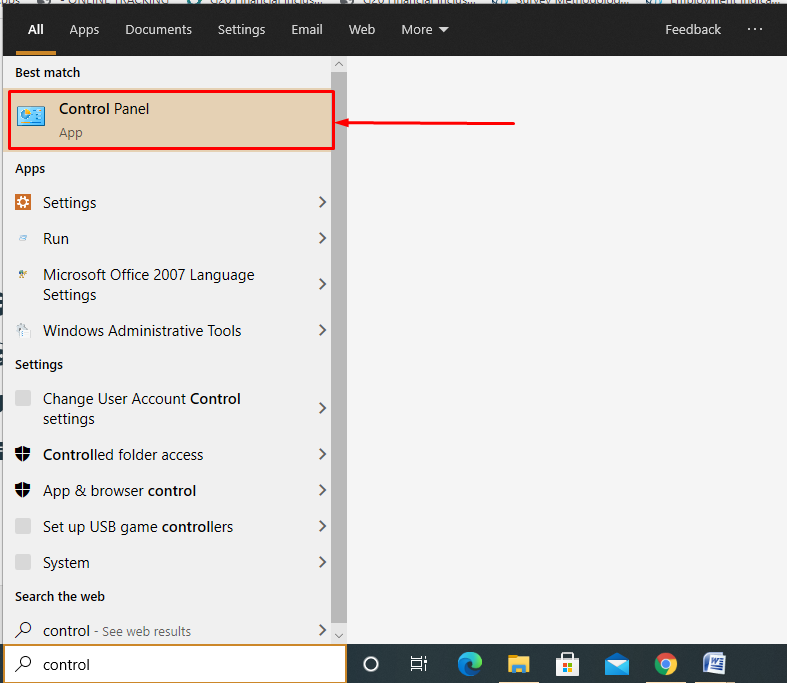
2) Select Uninstall a program from the Category drop-down menu.

3) Select Uninstall from the menu that appears when you right-click Google Chrome.

4) To open the Run dialog, press the Windows logo key and R at the same time on your keyboard.

5) In the box, type %USERPROFILE%AppData\Local\Google\Chrome\User Data, and click OK.

6) Make a copy of the Default folder and save it somewhere else as a backup. After that, remove the original Default folder.

7) Get and install Chrome.
Fix 8: Experiment with Different DNS Servers
Finally, you can test by connecting to the internet through various DNS servers. A URL link to those images is used when a web page attempts to load images. If the site you’re visiting employs a Content Delivery Network (CDN) service (which serves images from various servers worldwide), the DNS server you’re using.
Your browser will not load the images if your current DNS servers have the incorrect IP address for your local CDN servers.
Switch your DNS servers to Google DNS servers to see if this is the problem.
1. Click and open Control Panel and navigate to Network and Internet > View network status and tasks.

2. Click on the Change adapter settings from the left navigation menu.

3. You will see a list of all network adapters—select Properties from the shortcut menu by right-clicking the active network adapter.

4. In the Wi-Fi Properties window, click the radio button under Internet Protocol Version 4 (TCP/IPv4). The following items are used in this connection. Under this, click the Properties button.

5. Check the box next to Use the following DNS server address. Set the Preferred DNS server to 8.8.8.8 and the Alternate DNS server to 8.8.4.4.

6. Click OK. Restart your computer to ensure that these changes take effect. Then, restart Chrome and test the web page once more.
Fix 9: Select the Show All Images checkbox
If other browsers usually function, the problem is most likely with Google Chrome. As a result, it’s time to begin troubleshooting Chrome.
Verify that the settings that can prevent images from loading are correctly configured. The first option to investigate is the Show All Images Chrome setting.
To find it, go to:
1. Open the menu by selecting the three dots on the right and then Settings.
2. Navigate to the Privacy and Security section and click Site Settings.
3. Navigate to the Content section of the Site Settings menu and select Images.
4. In the Images menu, check the Sites can show the images box.
A VPN not only allows you to access blocked content but also creates a secure network over the internet, encrypts your traffic, and protects your online activity. This way, prying eyes won’t be able to see what you’re browsing, and you’ll have more privacy.